Thursday, 13 March 2014

Salmon & Ricotta Fish Cakes


I'm always looking for quick and easy lunch time recipes. As much as I love to cook, sometimes it's nice to be able to throw lunch together in less than 20 minutes without having to eat boring, bland food.

Lunch time is a struggle for a lot of people, you're on the move, eating at your desk, in a workplace canteen or in the closest cafe to your office. It can be difficult to make good choices when you're surrounded by lots of other options....  I know a lot of people fall into the trap of eating sandwiches or soup from the deli or if you bring your lunch with you, it's the same chicken salad you've eaten every single day for the past year! Boring right?

I always recommend bringing your lunch with you to work... there's so many benefits! Firstly you'll save money, and most importantly, you won't be tempted to make poor choices. By preparing your own meals, you are taking control of what you're eating since you know exactly what it contains..


These fish cakes are great hot or cold so don't worry if you don't have access to a microwave at lunch time... You can use fresh salmon rather than canned, but this is a perfect lunch if you're caught without fresh meat or fish to hand...

For the fishcakes:
  • 1 can pink salmon
  • 50g sweet potato, steamed & mashed
  • 3 tsp ricotta cheese
  • sea salt 
  • pepper 
  • chilli flakes

Add mashed sweet potato, salmon, 1 tsp ricotta and seasoning to a mixing bowl.


Mix well until just combined. 


Divide mixture in half, form into 2 fish cakes pressing 1 tsp of ricotta into the centre of each.


To coat:
  • 2 tbsp ground almonds
  • 1 tbsp grated parmesan
  • 1 tbsp mixed seeds
  • sea salt 
Mix ingredients together and roll each of the fish cakes until evenly coated. 


To cook:

Fry the fish cakes for 4 minutes per side in melted coconut oil or butter. All the ingredients are already cooked so you're really just looking for a crispy exterior with the centre warmed through and the ricotta to melt. 

Serve with lots of spinach drizzled with a little olive/walnut oil. 


Wednesday, 12 March 2014

Brookies!!


Thanks to Aimee for the name! Part cookie, and part brownie these grain & refined sugar free Brookies are the ultimate in healthy greed!!

The base is a delicious chewy chocolate chip cookie, and the topping a rich fudgy brownie... You can't decide if you want a cookie or a brownie? Thank GLBTK for these awesome Brookies!


The best part? They're made using recipes I've already shared! With a little imagination you can adapt all my recipes to change flavours and keep things varied... or you can wait for me to do it for you!

To make the Brookies:

So for the cookie base, I used this Chocolate Chip Cookie recipe... they're pretty awesome when made as cookies too!

Start by preheating the oven to 160d (fan). Line 7" square tin with baking parchment.

Make the cookie dough as per the recipe (I used Cacao Nibs).


Set aside to chill while you prepare the brownie batter. I just used the brownie part of this recipe (ie. without the cheesecake topping).


To assemble:

Press the chilled cookie dough into an even layer in the base of the prepared tin.

Top with the brownie batter and spread evenly.


Bake for 15-20 minutes (this really depends on your oven). You'll know the Brookies are baked when they are firm with a slight wobble in the centre. They will continue to cook a little from the heat of the tin once removed. Don't leave them as underbaked as you would with brownies or the gooey chocolate will seep into the biscuit base making it soft.


Set aside to cool before cutting into bitesize squares.


These are about as indulgent as it gets! Serious awesomeness right here!


Tuesday, 11 March 2014

Sticky Toffee Pudding...

As much as GLBTK is about sharing information and helping others to realise that eating real, healthy food doesn't have to be boring, I write these recipes for selfish reasons too... I love to bake, it's my 'thing'. We all have a 'thing'... you know that 'thing' that you do when you want to cheer yourself up, forget about every day stresses or simply just cos you love to do it.

I switch off when I'm in the kitchen, I don't worry about anything... I know some people find baking stressful, BUT... If you follow my recipes, step by step... I promise they'll work. Just be patient, measure everything & do as your told :)


There's very little about the name 'Sticky Toffee Pudding' that implies it's going to be healthy! However, as always, I've come up with a way to make this classic dessert a lot healthier, using only natural ingredients which won't interfere with your progress. Of course, it's still dessert and shouldn't be eaten all the time just because it's refined sugar & grain free... BUT I'm firmly of the opinion that everyone can have dessert sometimes and it doesn't have to make you feel sluggish or bloated afterwards...


This Sticky Toffee Pudding went down a treat... clean plates all round, and lots of compliments. Steaming the pudding means it stays really moist and light in texture.. 

For the pudding: 
  • 175g pitted dates
  • 100g butter, melted
  • 4 tbsp Irish honey
  • 3 tbsp coconut cream (or 6 tbsp coconut milk)
  • 1 tsp vanilla extract
  • 3 large eggs
  • 150g ground almonds
  • 1 tsp bicarbonate of soda
  • 1 tsp cinnamon

Preheat oven to 160d (fan). 

Place dates in a bowl and cover with boiling water. Set aside to soften.


Mix melted butter with honey, coconut cream/milk and vanilla. 


Whisk in eggs, one at a time, beating well between each addition. 


Drain water from the dates, and pulse the softened dates in a food processor. Stir into liquid mixture. 


Finally mix in ground almonds, bicarb & cinnamon. Do not over-mix, stir until just combined.


Pour into 8 non stick pudding bowls (or use an 8" cake tin if you prefer). Place pudding bowls into a shallow roasting tin with approx 1" of boiling water in the base to create steam in the oven.


Bake for 30 minutes until well risen and firm to touch. 


Invert on a plate to remove from the moulds. 


For the toffee sauce: 
  • 250ml coconut milk 
  • 1 tsp vanilla extract
  • 1 tsp butter
  • 1 tsp Irish honey 
  • 4 pitted dates
  • 1 tsp cinnamon
Add all the ingredients to a saucepan. 


Bring sauce to the boil. Allow to boil for 2-3 mins, stirring constantly. This will allow the sauce to reduce and thicken and turn golden in colour. 


Once the sauce is thickened (pouring consistency), remove from the heat. 


To serve: 

Smother the puddings in toffee sauce & serve warm... 


These puddings really are incredible! They're so simple to make, and they're even better than the original!

Thursday, 6 March 2014

Banana & Chocolate Marble Cake

A friend asked for chocolate banana bread.... so I couldn't resist buying bananas immediately and getting into the kitchen. That'll be the obsessive cooking disorder kicking in again...


If you love bananas and chocolate, then this is without a doubt the cake for you. It's a great way to use up those overripe bananas.

As with all my recipes, it's grain free and only uses a tiny bit of honey... perfect for having a treat whilst not undoing all your progress..


For the cake:
  • 50g coconut oil, melted
  • 2 bananas, mashed
  • 4 eggs
  • 1 tsp vanilla extract
  • 2 tbsp Irish honey
  • 2 tbsp coconut milk
  • 150g ground almonds
  • 2 tsp GF baking powder
  • 3 tbsp cocoa powder
  • 1 additional tbsp coconut milk

Preheat oven to 160d (fan). I used a 7" bundt tin but you can use an 8" square tin if you prefer. 

Add the first 6 ingredients to a large mixing bowl. Whisk until well combined. 


Next add the ground almonds and baking powder. Fold in to the liquid mixture. 


Place half the cake mixture into a separate bowl and add the cocoa powder and 1 tbsp of coconut milk. Stir until just combined. 


Spoon the mixture into the tin (alternating between banana and chocolate to create a marbled effect). Using a skewer, gently swirl the mixture to create a ripple effect through the cake. 


Bake in preheated oven for approx 30 minutes. (Will be a shorter bake time for a square tin - approx 20 mins, you'll know it's baked when the cake is firm to touch and a cake tester comes out clean). 


Serve warm with some homemade banana ice-cream or set aside to cool for icing. 


For the icing:
  • 2 tbsp butter
  • 2 tbsp unsweetened cocoa powder
  • 1 tsp vanilla
  • 2 tbsp coconut milk

Melt together over a gentle heat and stir until smooth and glossy. 

Pour over the cake, sprinkle with cacoa nibs and leave to set at room temperature. 


Wednesday, 5 March 2014

Lemon Drizzle Cake


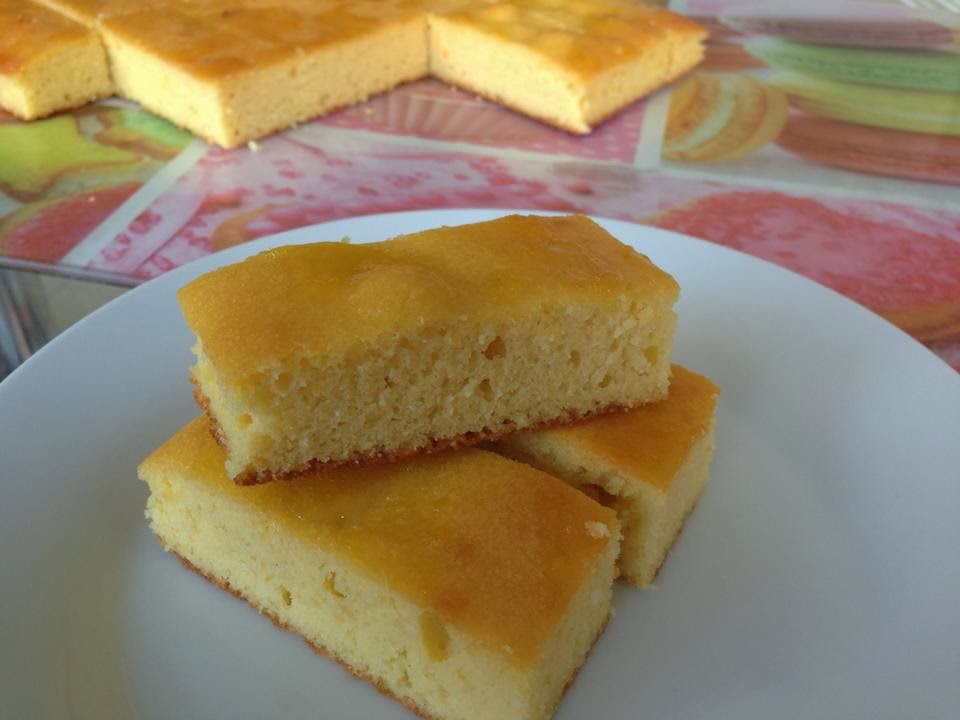
This is the PERFECT simple cake to make in a hurry... It's really quick to make, and tastes great. There's no need to mess around with icing it so there's even less washing up! 

Children will love the tangy lemon topping.. actually adults will too if this text is anything to go by "Lemon cake was amazeballs, kept licking the top to get the lemon taste"! Love it!!!

 
For the cake:
  • 150g butter, melted
  • 4 tbsp Irish honey
  • 1 lemon, zest & juice
  • 1 tsp vanilla extract
  • 4 eggs
  • 150g ground almonds
  • 1 tsp GF baking powder

Preheat oven to 160d (fan). Line an 8" square tin with baking parchment. 

Start by melting the butter, honey, lemon zest & juice together with vanilla extract. 


Whisk in eggs, one at a time, beating well between each addition. 

Finally stir in ground almonds and baking powder until well combined. Do not over-beat. 


Pour into lined tin.


Bake for 20-25 minutes until firm to the touch. 


For the syrup: 
  • 1 tsp lemon zest
  • juice of 1 lemon
  • 1 tsp vanilla extract
  • 1 tsp Irish honey

Place all ingredients in a small saucepan. 


Bring to a rolling boil for 30-40 seconds until thickened and syrup-like. 


Pour syrup over warm cake.


Set aside to cool before cutting into squares. 


Tuesday, 4 March 2014

Raspberry Stuffed Pancakes


You'd never guess that I liked pancakes! I almost didn't post a recipe for pancakes today, but then realised that would just be odd since it's Shrove Tuesday!

These are a little more time consuming than some of the other recipes I have posted, but they're still actually really simple to make.


For the pancakes:

  • 3 eggs 
  • 1 tbsp coconut milk
  • 1 tsp vanilla extract
  • 2 tbsp milled flax seed
  • 1 tbsp ground almonds
  • 1 tbsp vanilla whey protein (or sub for ground almonds)
  • 2 tsp GF baking powder


Whisk all the ingredients together until combined and frothy. 


Set aside for 10 minutes. This allows the batter to thicken slightly, and gives you time to make the filling. 

NOTE: As you make the filling, preheat the oven to 170d. Place a non stick bun tray into the oven to allow it  to heat up. 

Raspberry filling:
  • 75g frozen raspberries
  • 1 tsp vanilla extract
  • 1 tsp water

Place the raspberries into a small saucepan. 

Bring to the boil before reducing the heat. Allow to simmer for 3-5 minutes until the mixture has thickened. 


Set aside to cool slightly. 


To bake the pancakes:

Remove the hot bun tray from the oven. 

Immediately pour 1 tbsp of batter into each hole. 


Top with 1 tsp of raspberry filling.


Finally pour 1 tbsp of batter over the top. 


Place back in the oven for 3-4 minutes at 170d. (All ovens vary so just keep an eye on them... they should be just firm & puffed up. If you over-bake, they will be chewy and dry) 


The pancakes will pop out of the the tray really easily. Serve with hot chocolate sauce